On-premises environments that have been utilizing Folder Redirection with Group Policy Objects (GPOs) and now shifting to a cloud-native approach, will need to ditch redirecting users' files and folders to a network share and start using a more modern approach such as OneDrive Known Folder Move (KFM).
Overview
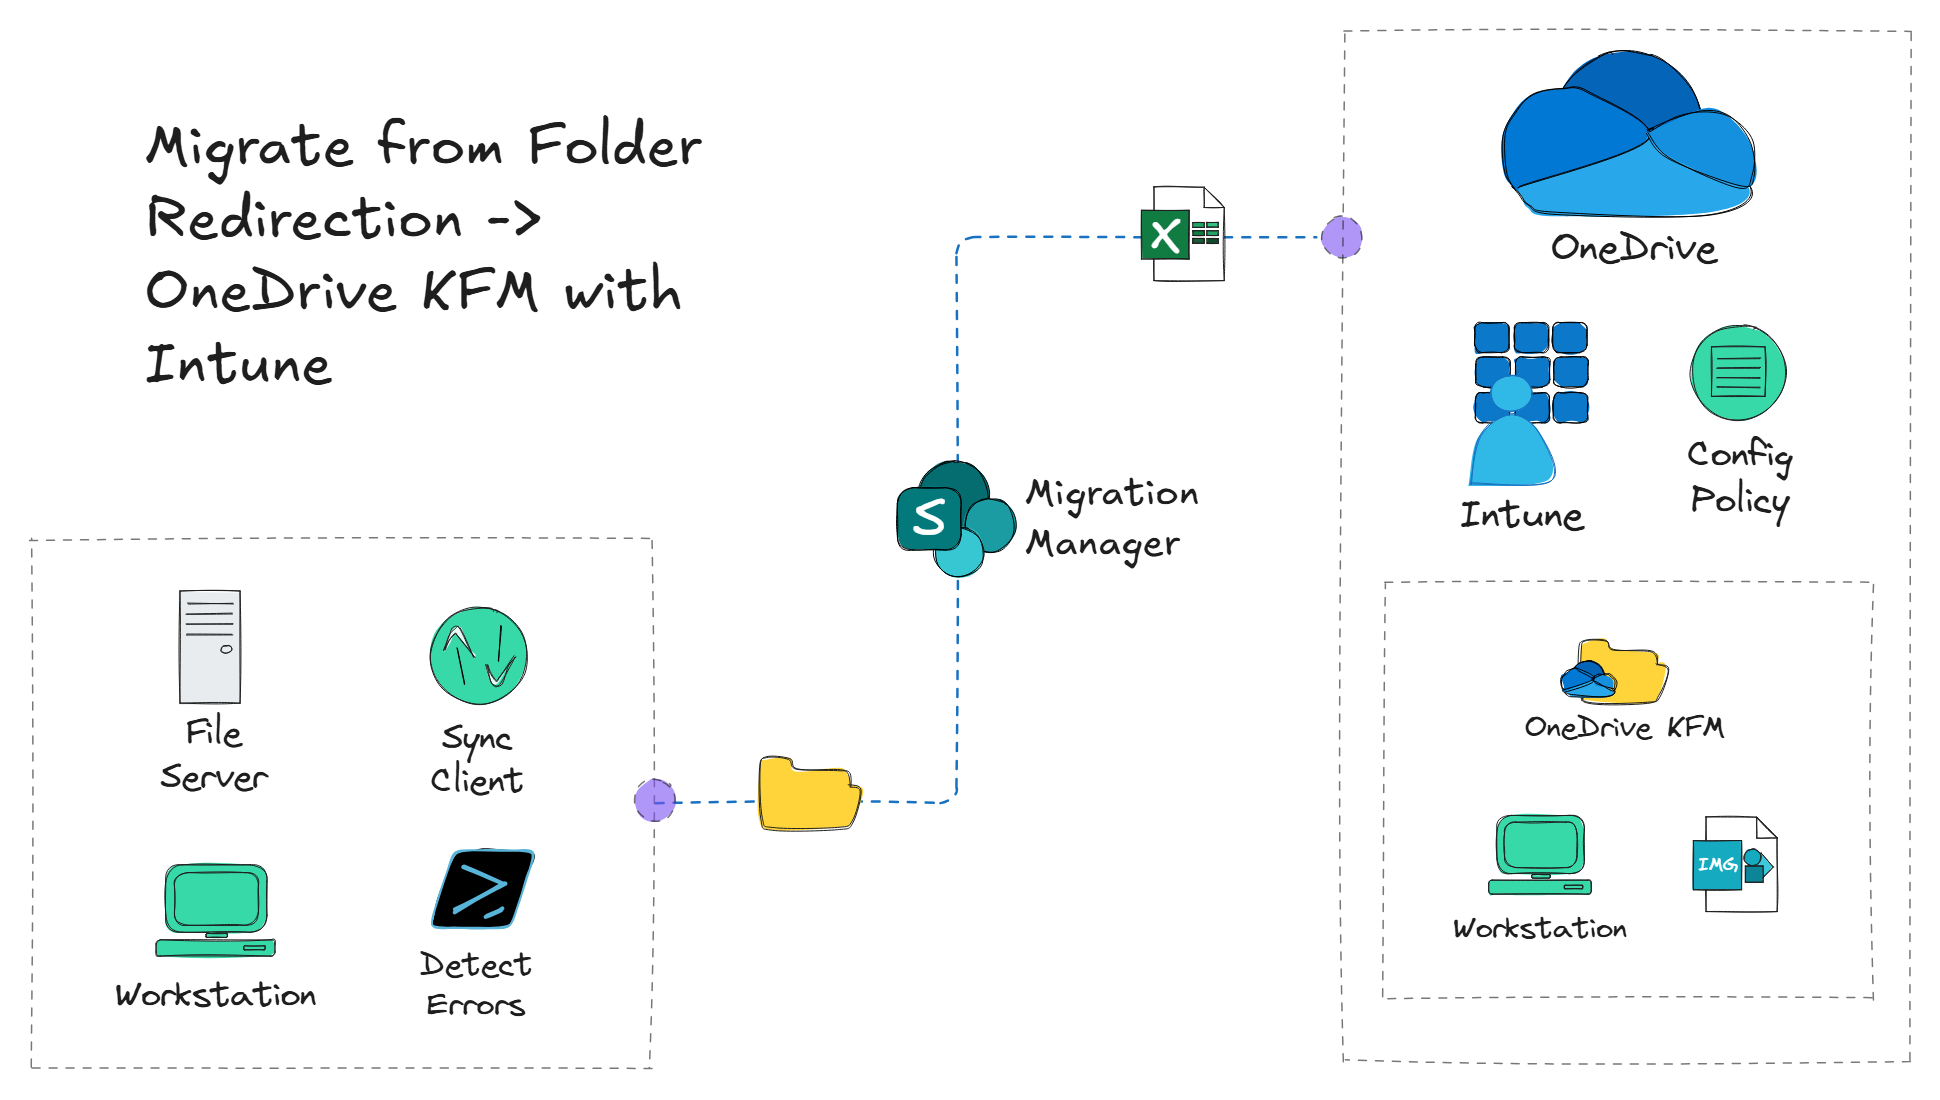
This article will guide you through the process of migrating from Folder Redirection to OneDrive KFM using Microsoft Intune. Along the way, we'll cover topics such as checking for folder path errors with PowerShell, utilizing the free Microsoft SharePoint Migration Manager to migrate files from the network share to a user's OneDrive, and configuring OneDrive KFM with Intune.
Prerequisites
- Microsoft Intune subscription
- An on-premises account with NFTS permissions to the root network share used for Folder Redirection
- Global admin or a OneDrive/SharePoint admin for Migration Manager
Step 1: Verify Folder Redirection GPO settings
Before we start the migration process, we need to confirm the current Folder Redirection GPO settings. This way, we know what the expected behavior should be once the policy is disabled for a specific user. We don't want any surprises - especially when it comes to a user's files. 😅 Navigate to the Group Policy Management Console to review this information.
Once the folder redirection GPO is located, navigate to the User Configuration > Policies > Windows Settings > Folder Redirection to view the settings. Right-click on the folder you want to check and select Properties. This will open the properties window where you can view the current settings.
For this example, the settings below are configured for the Documents and Desktop folders configured for Folder Redirection. Additionally, the NTFS and network share permissions recommended by Microsoft are configured on the root folder of the network share.
The Policy Removal setting is set to Leave the folder in the new location when policy is removed. This means that when the GPO is disabled, the user's files will remain in the redirected location such as the network share.

So an Administrator can still have access to user created files and folders, it is recommended to configure the Folder Redirection GPO to Not Grant user exclusive rights to folder. However, without configuring proper NTFS permissions on the root folder of the network share configured for Folder Redirection, this can pose a security risk and allow a user to access another user's files.

To mitigate the privacy and security concerns mentioned above, in conjunction with the Grant user exclusive rights to folder setting unselected, Microsoft recommends that the following NTFS permissions and share permissions be set on the root folder of the network share to prevent users from accessing each other's files:
The KB article recommending these settings can be found here.
NTFS Permissions
- CREATOR OWNER - Full Control (Apply onto: Subfolders and Files Only)
- System - Full Control (Apply onto: This Folder, Subfolders and Files)
- Domain Admins - Full Control (Apply onto: This Folder, Subfolders and Files)
- Everyone - Create Folder/Append Data (Apply onto: This Folder Only)
- Everyone - List Folder/Read Data (Apply onto: This Folder Only)
- Everyone - Read Attributes (Apply onto: This Folder Only)
- Everyone - Traverse Folder/Execute File (Apply onto: This Folder Only)
Share Permissions
- Everyone group - Full Control
This would allow for a domain user in the Domain Admins group to have access to the user folders created by the Folder Redirection GPO and all the child files and folders created by the user. However, if this is not the case, the NTFS permissions may need to be adjusted accordingly. In most cases, a Domain Admin will have to take ownership of the folder to grant themselves the appropriate NTFS permissions.
Step 2: Scan each user's home folders for maximum path length errors using PowerShell
When migrating to OneDrive, it is important to keep in mind that OneDrive adds the Microsoft 365 organization name to the path for Desktop, Documents, and Pictures. This can cause issues with files and folders that have paths longer than 247 characters when combining the Microsoft 365 organization name - especially if the organization name is long. 247 characters is the maximum path length allowed by the OneDrive desktop sync client. To avoid these issues, it's beneficial to scan each user's home folder for any paths that exceed this 247 character limit before attempting to migrate their files and folders to OneDrive. Fortunately, there is a PowerShell module that can do just that. 🚀
The following PowerShell module can be used to scan users' home directories redirected to the network share using Folder Redirection. Download the module from GitHub here
-
Once the PowerShell module is downloaded, open a PowerShell session and import the module:
Import-Module -Name "C:\Path\To\ScanFolderRedirectionPaths.psm1"
-
Use the Get-ScanFolderRedirectionPaths cmdlet to scan the user's folder for path too long errors:
Test-FolderRedirectionPaths -RootPath "\\server\home\" -TenantName "<M365TenantName>" -ShowProgress -Summary | Format-Table
Test-FolderRedirectionPaths -RootPath "\\server\home\" -TenantName "<M365TenantName>" -UserName "user1" -ShowProgress | Where-Object {$_.RequiresAction -eq $True} | Export-Csv -NoTypeInformation "results.csv"
-
Review the results of the scan. If any paths are over the 247 character limit, they will be listed in the RequiresAction column. These paths will need to be addressed before proceeding with the migration to OneDrive KFM.
Updating the Microsoft 365 organization name to the shortest possible version while still maintaining a professional appearance can help prevent the need for users to update their file and folder names if they have paths that exceed the 247 character limit. The organization name can be changed relatively easy, and does not impact existing SharePoint or OneDrive URLs. Steps on changing the organization name can be found in the Microsoft docs here.
Step 3: Utilize the free Microsoft SharePoint Migration Manager to migrate user files to OneDrive
This section of the guide assumes the Migration Manager agent has already been installed and configured on a Windows Server with access to the network share. Steps on installing the agent and configuring Migration Manager can be found in the here.
The SharePoint Migration Manager is a free tool provided by Microsoft that allows you to migrate files from a network share to a user's OneDrive. This tool is designed to work with both SharePoint and OneDrive, making it a good option for file migration to OneDrive that doesn't require user intervention.
- Navigate to the Microsoft 365 admin center and click ... Show all > SharePoint.
- In the left navigation pane, click Migration.
- Under File shares, click Get started (if migrations already exist, this button will display as View tasks instead of Get started).

- Under the Scans tab, click + Add source path.
- Add sources paths > select Specify a single source path or Upload a CSV file. For this example, we will select Specify a single source path.
- Enter the full path to the user's network share folder. For example,
\\server\share\username. Select the Add all subfolders as source paths and Automatically scan content checkboxes. Click Add.
Give Migration Manager roughly 15-20 minutes to scan the network share for files. Time for a tea or coffee break! 🍵
- After the scan is complete, if the Scan result column indicates Migration warnings found, click Download scan log to get a more detailed overview of the error associated with any of the files and folders. If there are not errors to address, proceed to the migration by selecting the source path and clicking -> Copy to migrations.
- Add a destination > select OneDrive.
- Under Select your OneDrive destination > Enter a OneDrive URL or and email address, enter the URL to the target user's OneDrive. For example, use the following format:
https://<tenant name>-my.sharepoint.com/personal/<user principal name>. Under Select the location you want to copy your files to and select the corresponding folder. Click Next.
When selecting the destination folder, don't be confused by the Documents section. This is not a Documents folder that exists in the user's OneDrive. This is essentially the root directory of the user's OneDrive.
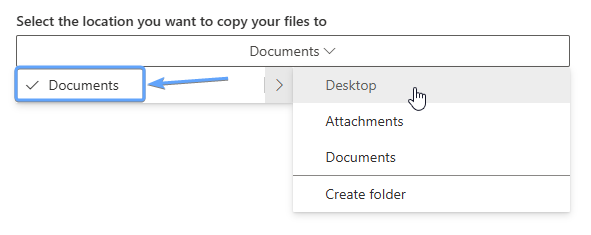
If the desired folder doesn't exist, click Create folder to create the appropriate folder in the user's OneDrive. For example, create a Desktop folder when migrating the user's Desktop folder.
- Under Configure settings, configure the following settings:
- Task schedule: Select Run now.
- Agent group assignment: Select Default.
- Common settings: Unselect Preserve file share permissions.
- filters: Unselect Migrate hidden files.
- Enable version history: Select Enable version history.
- Users: Unselect Microsoft Entra ID lookup. (This isn't applicable since Preserve file share permissions is unselected.)
- Click Run to start the migration task.
Navigate to the Migrations tab to view the status of the migration task. If the Status column indicates Complete, the migration task was completed successfully. Congratulations! You can take the rest of the day off and treat yourself to a pizza! 🍕 Just kidding... We have more work to do.
In the example above, only a single user's files were migrated using the Migration Manager. However, it's worth noting that the Migration Manger can migrate multiple users' files at once by uploading a CSV file with the appropriate columns and values in the CSV template.
This section of the guide assumes devices being configured to use OneDrive KFM with Intune are Entra-joined (cloud-native). Remember, the goal is to move away from on-premises device management.
- Navigate to the Microsoft Intune admin center and click Devices > Manage Devices > Configuration > + Create > + New Policy.
- Create a profile
- Platform: Windows 10 and later
- Profile: Settings catalog
- Finalize the Creation
Click Create.
- Click + Add settings.
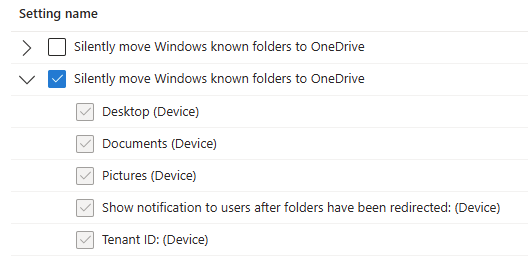
- Under the Settings picker, search for
Silently move Windows known folders to OneDrive.
- Under Browse by category, click OneDrive.
- Select the checkbox next to Silently move Windows known folders to OneDrive and click Select.
If there are two options for Silently move Windows known folders to OneDrive, select the option that includes Desktop, Documents, and Pictures folders.
- Under Configuration settings, select + Add settings once again.
- Under the Settings picker, search for
Silently sign in users to the OneDrive sync app with their Windows credentials.
- Under Browse by category, click OneDrive.
- Select the checkbox next to Silently sign in users to the OneDrive sync app with their Windows credentials.
- Now that all the necessary settings have been added from the Settings catalog, use the following settings to configure KFM:
- Silently sign in users to the OneDrive sync app with their Windows credentials: Enabled
- Silently move Windows known folders to OneDrive: Enabled
- Desktop (Device): True
- Documents (Device): True
- Pictures (Device): True
- Show notification to users after folders have been redirected: (Device): No
- Tenant ID: (Device):
Tenant ID
The Tenant ID can be found in the Microsoft Entra admin center under Overview > Tenant ID.
- Select the appropriate Assignments and Create the policy.
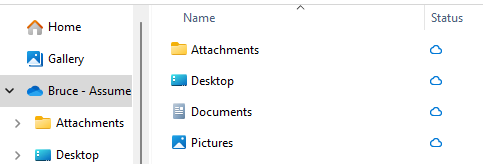
Now, the next time our user signs into their Intune managed device, the OneDrive KFM policy will be applied and th Documents and Desktop folders that were migrated from the Folder Redirection network share to the user's OneDrive using the Migration Manager will be synced to the user's device.
Conclusion
Migrating from on-premises Folder Redirection to OneDrive Known Folder Move (KFM) is a fairly straightforward process when using the right tools along with some proper planning. The steps outlined in this article can be applied to a single user or scaled to migrate multiple users at once.