Intune Custom Compliance Policies: Detecting Real-World Drift

When it comes to configuring compliance policies, Intune provides settings out of the box that can be monitored for config drift, such as BitLocker enabled, minimum OS version, and Antivirus to name a few. However, if the setting (or state) you want to capture isn't included, Intune provides a way to use PowerShell to detect this information on an endpoint with custom compliance policies.
The example used throughout this post is CVE-2013-3900 which is a WinVerifyTrust flaw that lets a signed binary carry appended data and still pass signature validation. Microsoft shipped the fix as opt-in: the EnableCertPaddingCheck registry value is not set by default. You can push down the registry fix with a Platform script, Win32 App, or remediation script with Intune, but without compliance detection in place, you have no way to detect drift. That gap is what a custom compliance policy covers.
Prerequisites
- Microsoft Intune subscription
- A text editor (Visual Studio Code is a great open-source editor)
What is a Custom Compliance Policy?
Creating a custom compliance policy in Intune requires a PowerShell detection script as well as a JSON file. Custom compliance policies can be used when the out of the box compliance settings don't satisfy the requirement.
Create a Custom Compliance Detection Script
Download the PowerShell detection script and JSON file used in the example below from my GitHub repo
If you want to learn more about how to write your own custom compliance detection script and JSON file, Steve Weiner has a great video on this topic that you can check out here.
All the following steps are performed in the Microsoft Intune admin center.
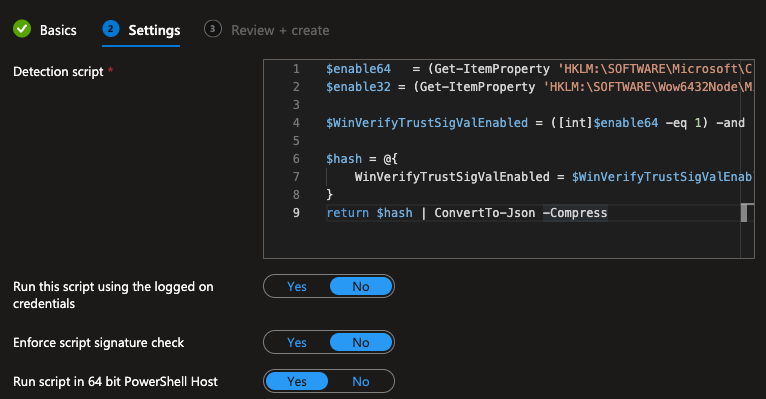
First we need to create the PowerShell detection script and JSON file that will be used for the custom compliance policy. The PowerShell script will confirm that the EnableCertPaddingCheck registry value is set to 1, and the JSON file will define the compliance policy configuration.
- Select Devices > Manage Devices > Compliance > Scripts > + Add > Windows 10 and later
- Under the Basics tab, provide a name and description for the script, then click Next.
- Name: WinVerifyTrust Signature Validation Required
- Under Settings configure the following:
- Detection script: If following along with the example, use the
Get-WinVerifyTrustCompliance.ps1PowerShell script from the GitHub repo linked above. - Run this script using the logged on credentials: No
- Enforce script signature check: No
- Run script in 64 bit PowerShell Host: Yes
- Detection script: If following along with the example, use the
- Click Next > Create
Create a Custom Compliance Policy
-
Select Devices > Manage Devices > Compliance > + Create Policy
- Platform: Windows 10 and later
- Platform type: Windows 10/11 compliance policy
-
Click Create and configure the following:
- Name: WinVerifyTrust Compliance Policy
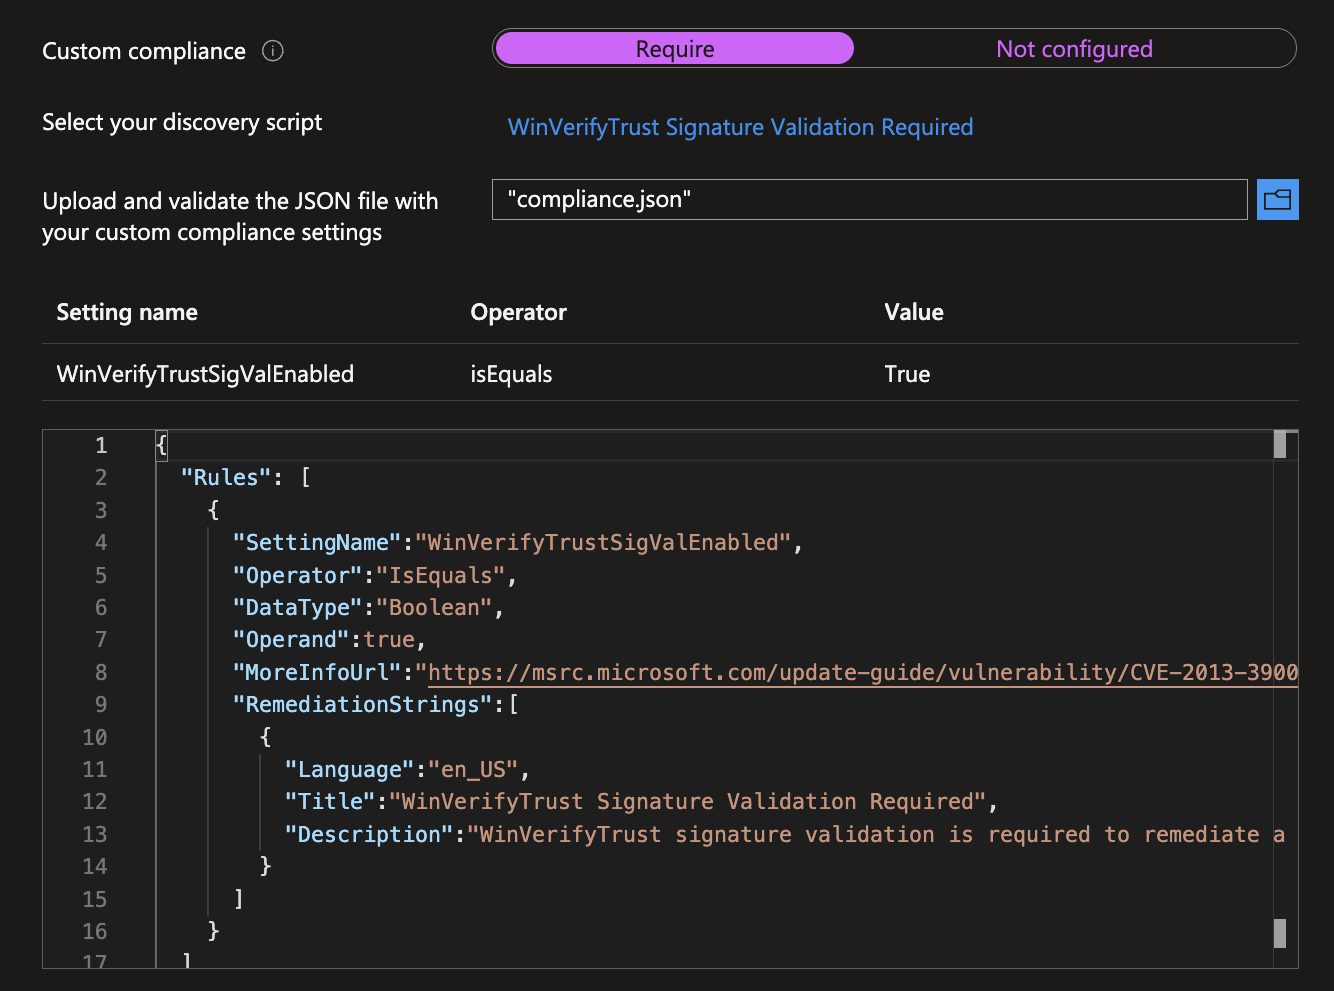
- Compliance settings: Custom compliance
- Custom compliance: Require
- Select your discovery script: Select the
WinVerifyTrust Signature Validation RequiredPowerShell script
-
Configure the noncompliance action:
- Actions for noncompliance: Mark device noncompliant immediately
-
Assign the appropriate group(s) to the policy and click Create.
How the IME Executes Custom Compliance Detection Scripts
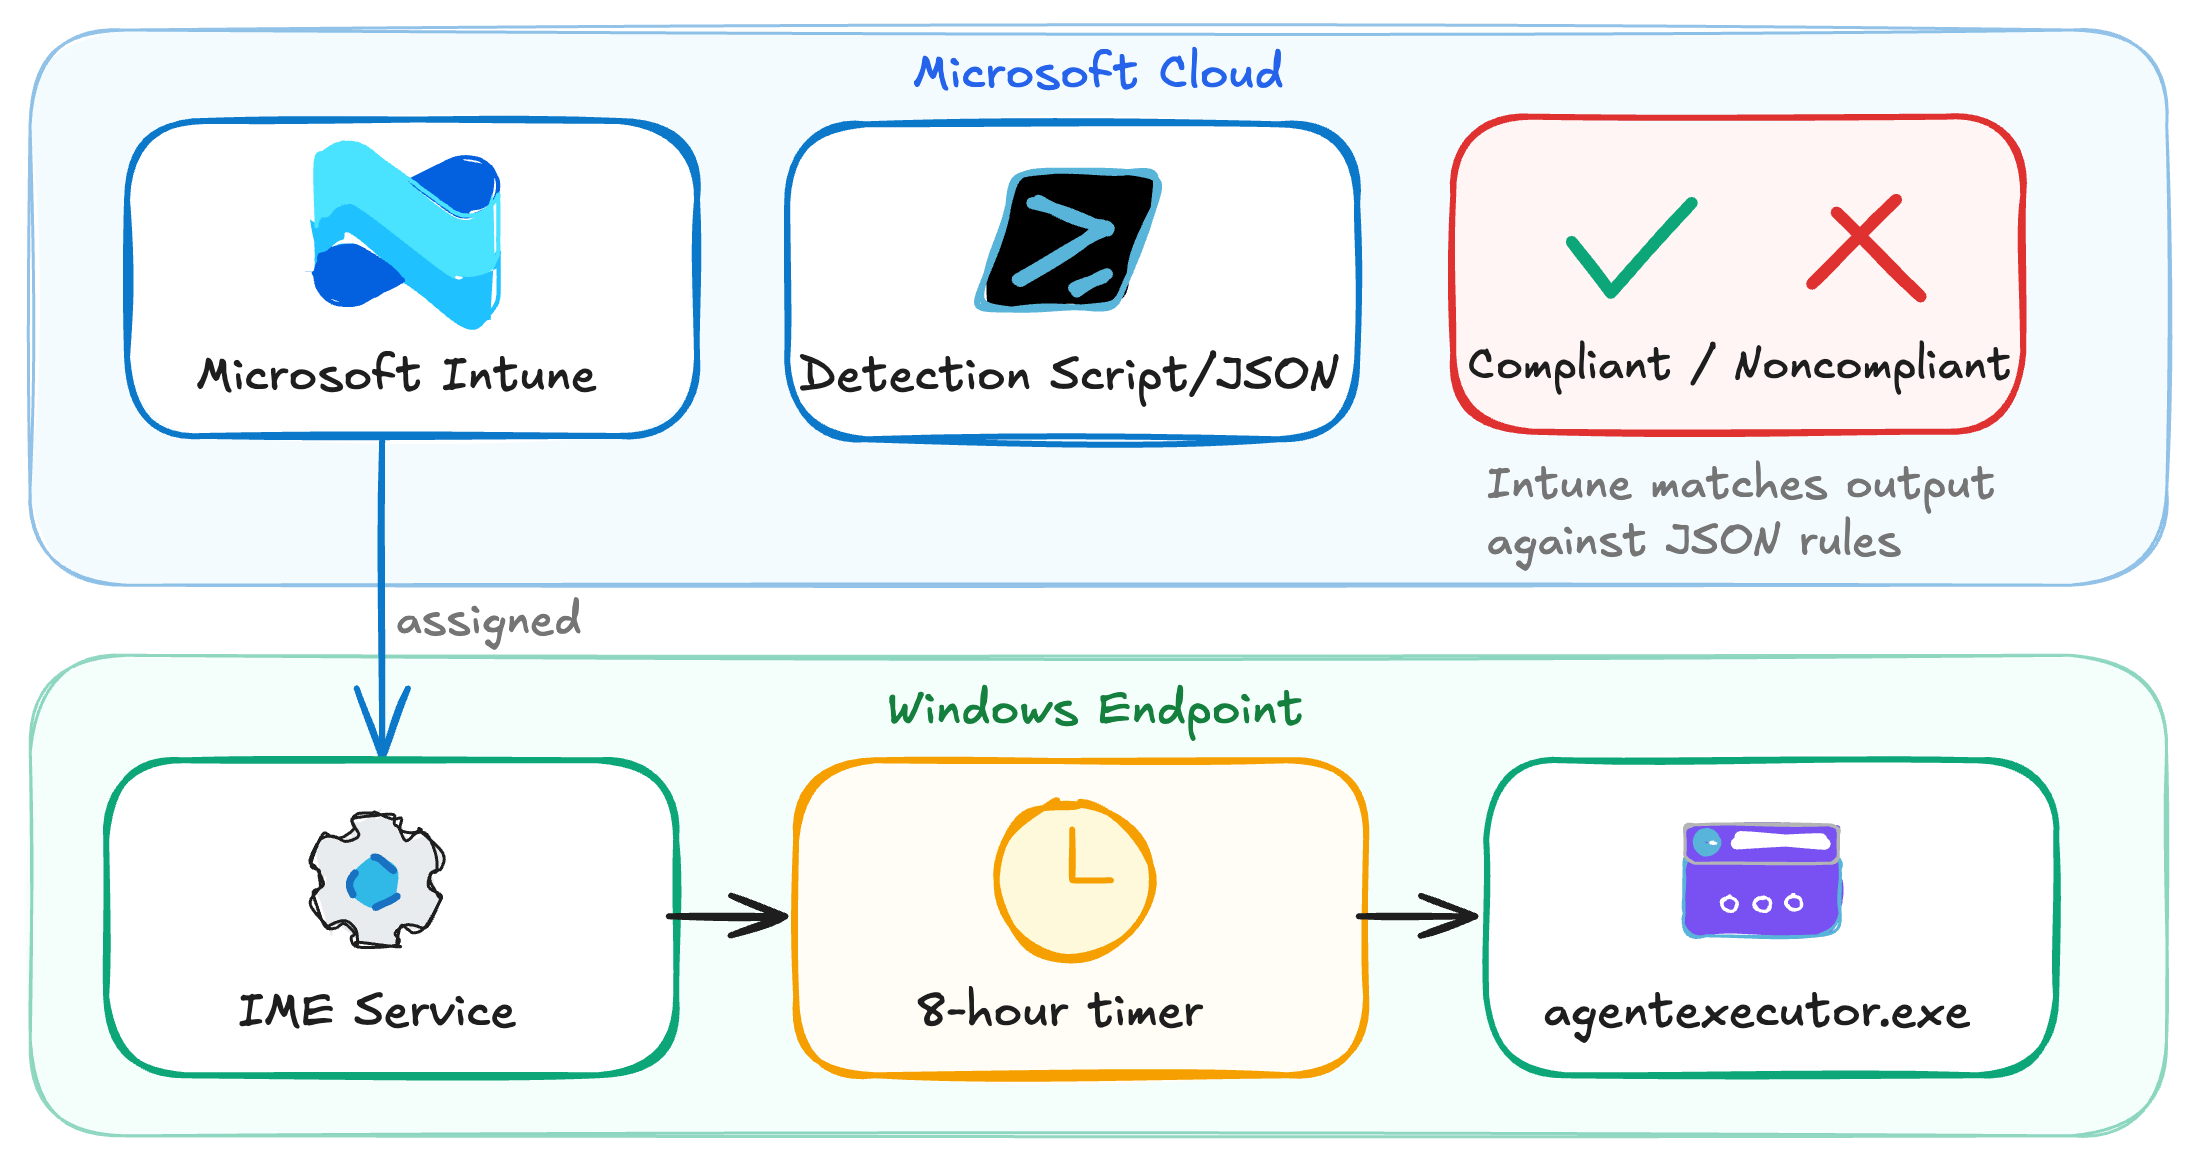
The Intune Management Extension (IME) is the on-device agent that orchestrates the retrieval of the custom compliance detection script from Intune, running the script using the AgentExecutor, and updating the appropriate registry keys to indicate whether the device is compliant or not.
Let's see it in action.
Force the Detection Script to Re-Evaluate
If you want to use a PowerShell script to automate the steps below, take a look at the blog post written by Rudy Ooms on custom compliance policies. His script parses C:\WINDOWS\IMECache\HealthScripts\ to discover the detection script GUID, then deletes the matching registry subkeys.
To bypass the internal 8 hour timer, we're going to speed things up so we can watch what takes place when a custom compliance policy runs in real time. We can do this by performing a few steps.
From the Intune admin portal, navigate to the PowerShell script associated with the compliance policy to locate the GUID of the script. This can be found in the URL path of the script.

From the endpoint, under the HKEY_LOCAL_MACHINE\SOFTWARE\Microsoft\IntuneManagementExtension\SideCarPolicies\Scripts\Execution and the HKEY_LOCAL_MACHINE\SOFTWARE\Microsoft\IntuneManagementExtension\SideCarPolicies\Scripts\Reports registry keys, delete any subkeys that match the GUID of the PowerShell script that is associated with the custom compliance policy that was located earlier.

Make sure to look under the System registry key 00000000-0000-0000-0000-000000000000 and the user registry key(s) {USER_GUID} for the PowerShell script GUID, and delete any subkeys that match the GUID of the PowerShell script.
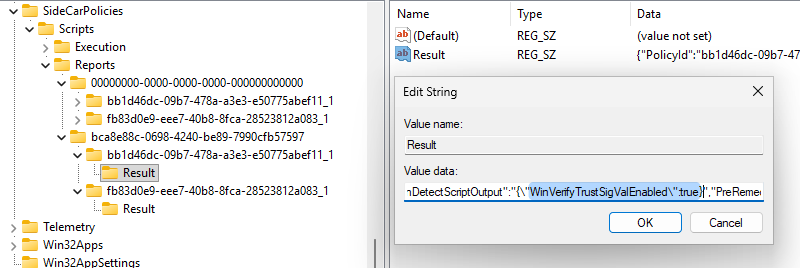
If we look in the registry value of the Result registry key before deleting it, it shows the cached result of the last time the IME ran the custom compliance script.
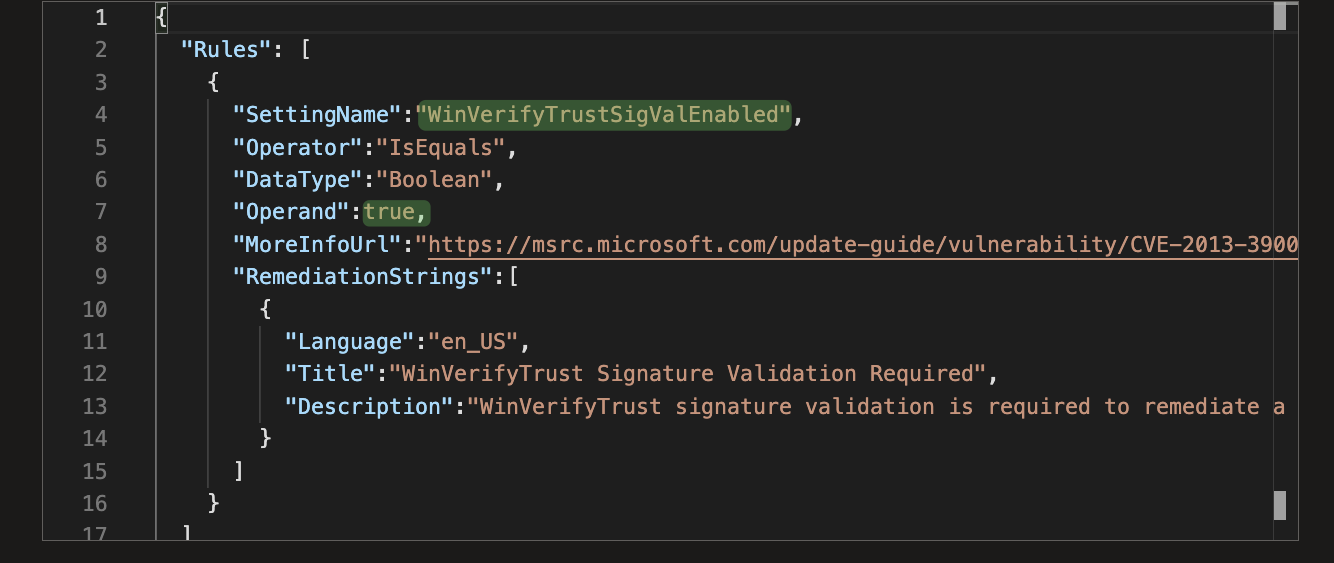
In this case, the last time the IME ran the custom compliance script, the JSON key WinVerifyTrustSigValEnabled that was defined when the policy was configured is set to true, which would indicate the device passed the script validation and is compliant.
The IME caches the results of the last time the custom compliance policy script ran in the registry values we just deleted. Now, if we restart the IME service, we can essentially trick the IME service into re-running the compliance script prior to the time set by the hard-coded 8-hour timer.
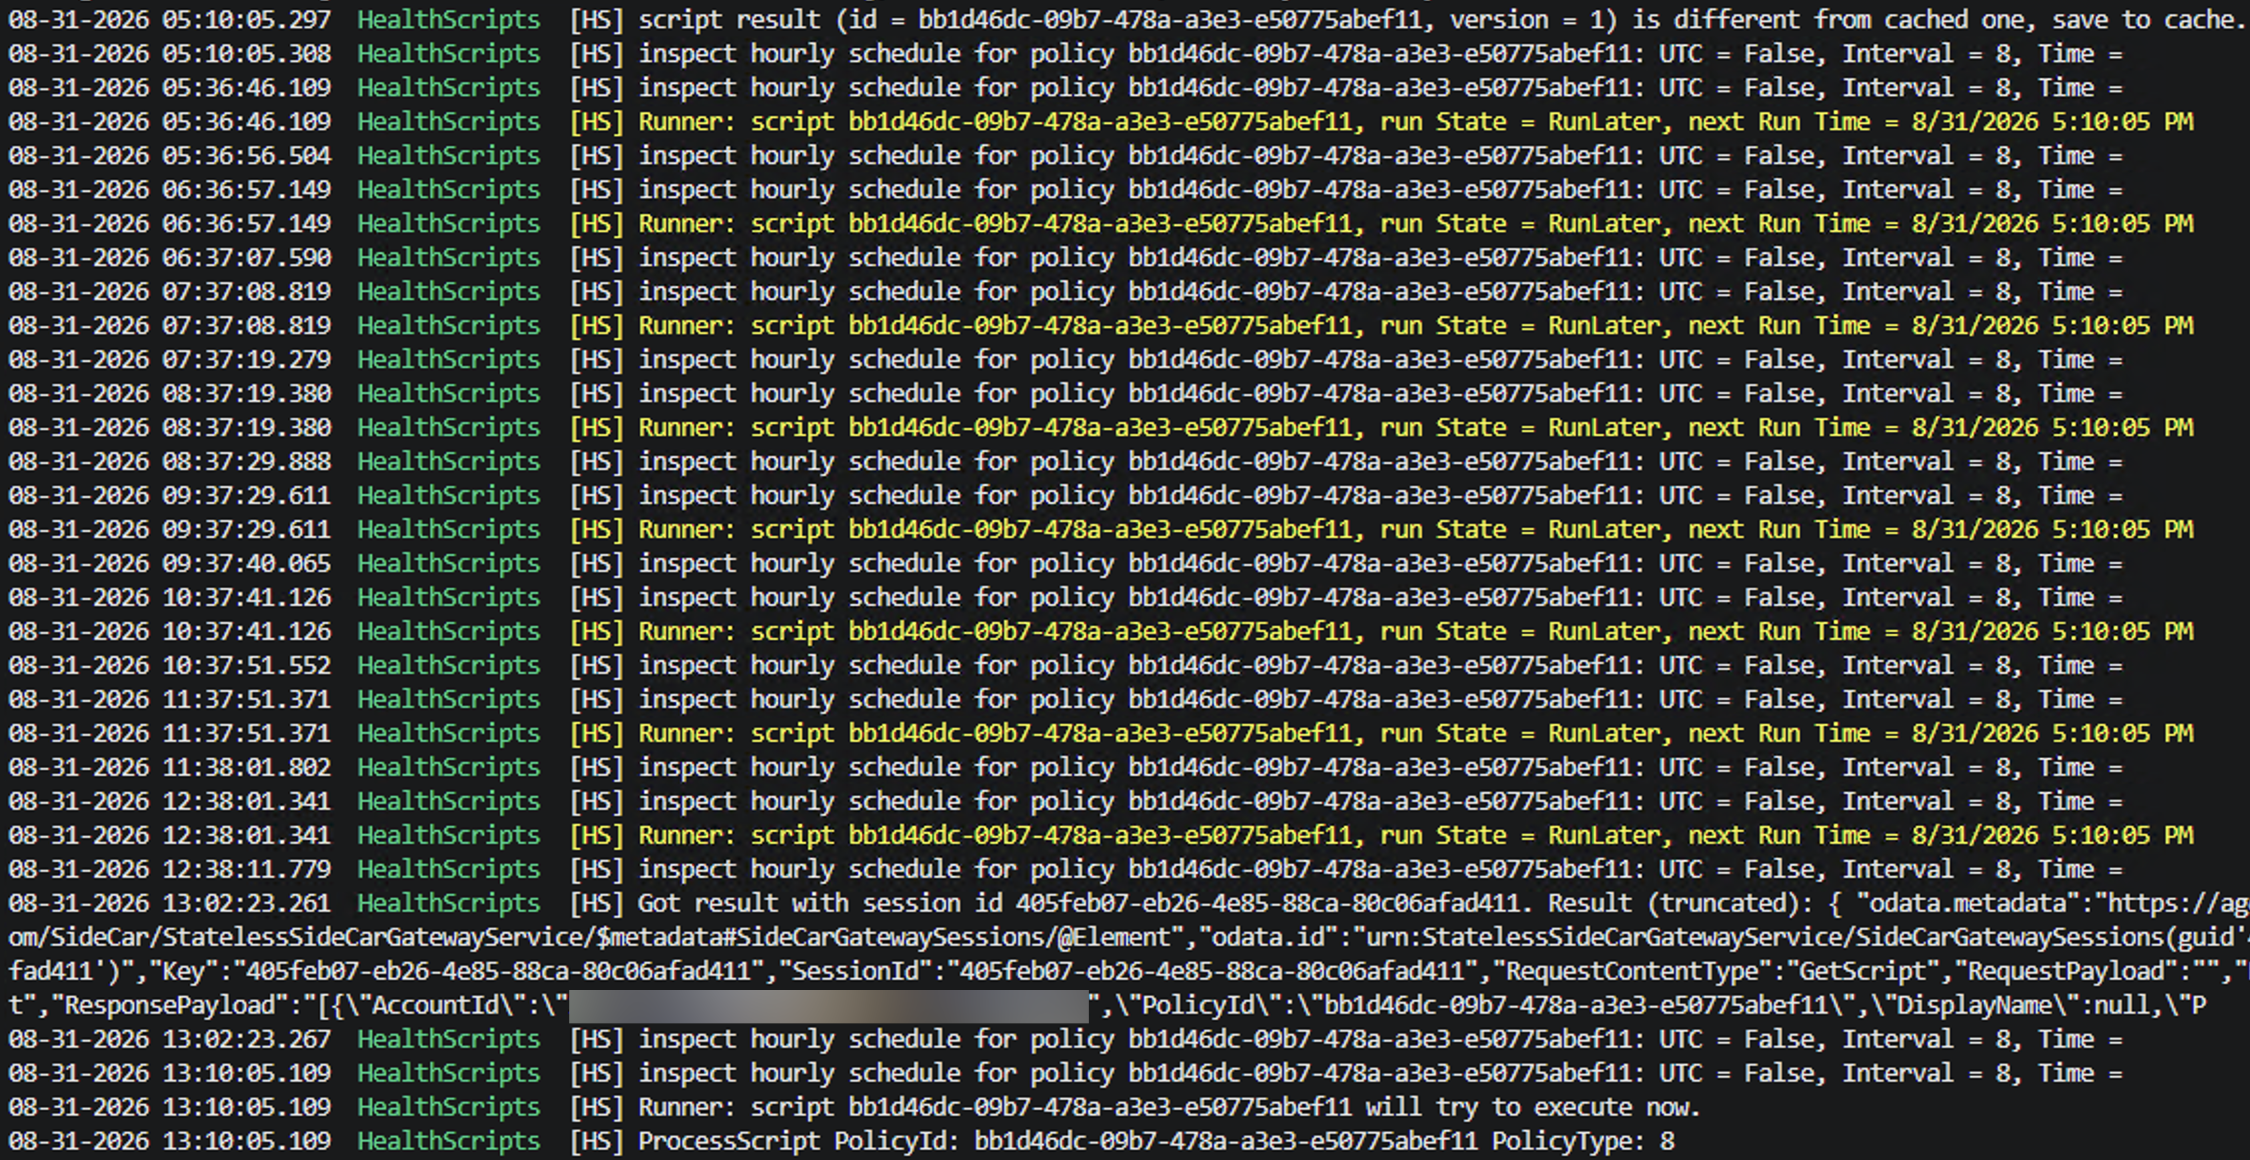
Here is an example of the hard-coded 8-hour timer at work. Every hour the IME checks to see if the next run time has arrived. If it has, the script will attempt to execute; if not, the IME will check again in another hour. There isn't a way to adjust this 8-hour timer from Intune – that's why it's considered "hard-coded".
Restart the IME service by running the following PowerShell one-liners.
Get-Service -DisplayName "Microsoft Intune Management Extension" | Stop-Service
Get-Service -DisplayName "Microsoft Intune Management Extension" | Start-Service
Give the IME around 10 minutes to execute the custom compliance script. If you take a look at the IME logs, you'll notice there is quite a bit of logs being generated after restarting the IME service. So be patient...
Now that the cached results of the last time the custom compliance policy PowerShell script have been deleted, and after restarting the IME service, there are a few specific IME logs that are of interest to understand what is happening from start to finish when the compliance policy is executed.
IME specific logs of interest are:
HealthScripts.logAgentExecutor.logIntuneManagementExtension.log
IME logs are located here:
C:\ProgramData\Microsoft\IntuneManagementExtension\Logs
Detection Script Run: Compliant Device
In this first go around, the necessary EnableCertPaddingCheck registry values are set to 1, so the script should return that the device is compliant. But let's take a closer look at the IME logs to get a better idea of what's happening under the hood.
If you want to know what is being used in the screenshots below, it's a IME log parser PowerShell script. You can download the script here.
-
After restarting the IME service, the
IntuneManagementExtensionlocates a cachedSideCarGatewayServiceUrland uses this to check-in with the Intune service for applicable policies and scripts.
-
One more hourly schedule (associated with the hard-coded 8-hour timer) is run before the IME service determines it "will try to execute [the detection script] now".

-
Then the IME service runs
C:\Program Files (x86)\Microsoft Intune Management Extension\agentexecutor.exe" -remediationScriptwith the necessary arguments to pass toagentexecutor.exe
-
agentExecutor.exereceives the arguments passed down by the IME service and then invokes PowerShell to run the detection script.
-
The results from the script execution are returned. The log indicates the
PreRemediationDetectScriptOutputis"WinVerifyTrustSigValEnabled\":true. note
noteNotice the logs indicate the results version is different from cached one, and to save to cache. This is because the registry values that contained the results of the last time the detection script ran were deleted prior to restarting the IME service.

-
The "new" results are written to the registry.

Detection Script Run: Noncompliant Device
In this run, most of the steps covered in the compliant IME run will be the same for the noncompliant run, so we won't cover everything all over again; however, we will go over where things change.
This time, from the registry HKLM:\SOFTWARE\Microsoft\Cryptography\WinTrust\Config\, I deleted the following registry value: EnableCertPaddingCheck so when the custom compliance script re-runs, the device should be evaluated as noncompliant.
As we did previously, the registry subkeys that contain the cached results of the last time the detection script ran are deleted, and the IME service is restarted.

The log output is essentially the same as we went over earlier. The primary difference is the output returned from the detection script. The output indicates that the WinVerifyTrustSigValEnabled JSON key is equal to false

There is something interesting here. Notice the log line the pre-remdiation detection script compliance result for bb1d46dc-09b7-478a-a3e3-e50775abef11 is True in the same run, but the device just returned false from the custom compliance policy detection script output... 🤔
This log output is misleading and can trip someone up that is digging through the logs troubleshooting custom compliance scripts. That value is actually set from the detection script's exit code, not from the script's output, and a PowerShell script that runs to completion without an explicit exit returns 0, so it logs True on every successful run.

The script output results are written to the following registry subkeys: HKEY_LOCAL_MACHINE\SOFTWARE\Microsoft\IntuneManagementExtension\SideCarPolicies\Scripts\Reports\<USER_GUID>\<SCRIPT_GUID>\

Subsequently, the results are shipped back to Intune and the endpoint is marked as noncompliant.
As we can see, the misleading log output: pre-remdiation detection script compliance result for bb1d46dc-09b7-478a-a3e3-e50775abef11 is True has no impact on Intune's decision making process when it comes to determining whether a device is compliant or not. Ultimately, Intune uses the custom compliance script output and the JSON file defined to determine what key value pair to extract from the script output to determine compliance.

Conclusion
What we've discovered in this post is that if something can be queried with PowerShell, a custom compliance policy can detect drift on it. We also found that a device can sit noncompliant for up to 8 hours before the detection script runs again and the result is shipped back to Intune.
Our best remediation for this problem using native Intune tools would be to configure an Intune Remediation (formerly Proactive Remediations), which can run a detection script and corresponding remediation script (if needed) as frequently as every hour.
Running a Remediation every hour would significantly shorten the gap from drift to remediation; however, even this solution has its drawbacks:
- The remediation is essentially running on a CRON job and isn't truly event-driven.
- Intune Remediations require a Windows Enterprise or Education license, which is separate from the license that grants Intune itself. At the time of writing, Microsoft requires Windows Enterprise E3 or E5 (included in Microsoft 365 F3, E3, or E5), or Windows Education A3 or A5 (included in Microsoft 365 A3 or A5). Business Premium and EMS do not meet this requirement.
As we continue through this series, we'll explore different solutions to reduce the delta from drift to remediation while minimizing disruption for our users.